- “The Giant is rising. Face the might of the Nazi Zombies in their heartland. This is where it all began. This is where the master plan took shape. Is this where it all ends?”
- ―Level Description
| Der Riese | |
|---|---|
 The loading screen in Call of Duty: Black Ops | |
| Vital statistics | |
| Prev Level | Shi No Numa |
| Next Level | Kino der Toten |
| Created By | Treyarch |
| Creation Date | 8/6/09 |
| Characters | Tank Dempsey, Nikolai Belinski, Takeo Masaki and Edward Richtofen |
| Enemies | Nazi Zombies, Hellhounds |
| Location | Lower Silesia, Near Breslau, Germany |
| Date | October 28th, 1945 |
Der Riese (German for "The Giant" pronounced Dehr Rees-uh), also known as Zombie Factory, is the fourth and final Nazi Zombies World at War map. It is set in a secret Nazi facility in Germany, and features the Teleporter and a Pack-a-Punch machine, which can upgrade players weapons. It was released on August 6th, 2009 as part of World at War's Map Pack 3 . It was later released on the iPhone OS September 30th, 2010. It was available if you bought the Hardend or Prestiged versions of Call of Duty: Black Ops. It was also released in the Rezzurection map pack. This map it's considered one of the best, because of the zombie felling.
Characters[]
Enemies[]
Weapons[]
Starting Weapons[]
Wall Weapons[]
- Bouncing Betties
- Bowie Knife
- Double-Barreled Shotgun
- FG42
- Gewehr 43
- Kar98k
- M1897 Trenchgun
- M1 Carbine
- MP40
- STG-44
- Thompson
- Type 100
Mystery Box Weapons[]
- .357 Magnum
- BAR
- Browning M1919
- M1 Garand w/ Rifle Grenade
- M2 Flamethrower
- MG42
- Monkey Bomb
- Panzerschrek
- PPSh-41
- PTRS-41
- Ray Gun
- Stielhandgranate (very rare)
- Wunderwaffe DG-2
- All Wall Weapons
Power-Ups[]
- Max Ammo (An Ammunition Box) - Gives all players full ammo for all guns. This will not refill the player's current magazine. It is a good idea for every player to reload before retrieving this pickup, to get the most ammo from it, particularly with LMGs.
- Nuke (A nuclear bomb) Kills all of the zombies in a vicinity. (Also gives 400 points to each player) Note that there is a delay between getting the Nuke, and the zombies dying.
- Insta-Kill (A skull) - Makes all of the zombies a one hit kill with any weapon. The player will receive 110 points per kill (100 and 10, separately). Knife kills obtain 130 points.
- Double Points (A "2X") - Doubles all points given to all players when damaging/killing a zombie or rebuilding a barrier. This will not double points given by Carpenter or the Nuke (excluding Black Ops maps)
- Carpenter (A hammer) - Rebuilds all barricades in the map. (Also gives 200 points to each player, if any barricades were fixed)
Perk-a-Cola[]
- Double-Tap Root-Beer - Increases the fire rate of all weapons.
- Jugger-nog - Makes the player 2x as durable.
- Speed Cola - Makes the player reload 2x as fast.
- Quick Revive - Makes the player revive downed team mates much faster.
Features[]
The Power[]
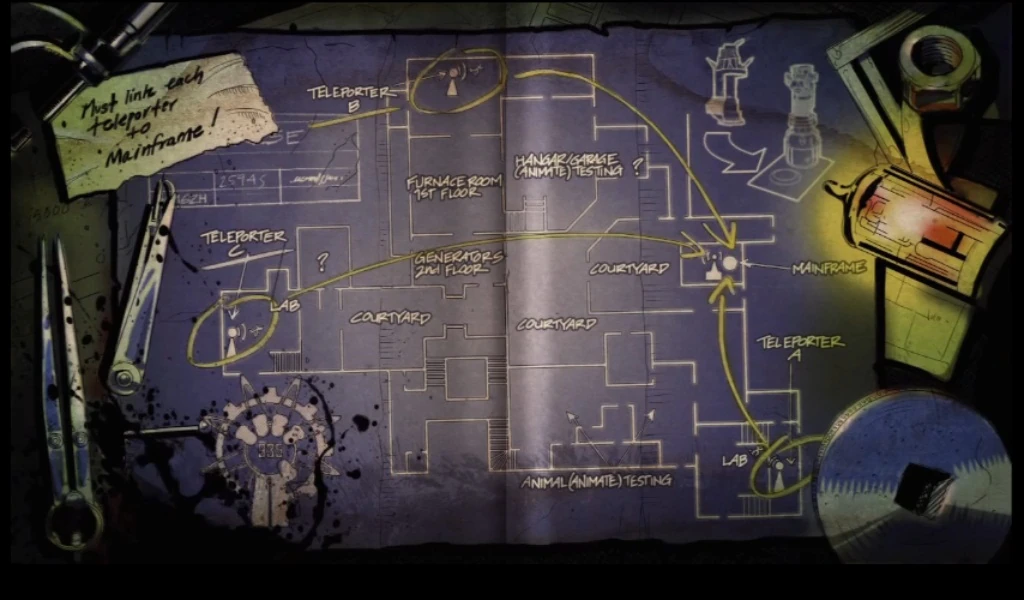
You have to turn on the power so that the teleporters can be linked so that the Pack-a-Punch Machine can be used. It will also open the doors in the right and left factory rooms, lower the bridge connecting the right and left hallways, and power the Perk-a-Cola machines.
Teleporters[]
Linking the teleporters requires the player to approach it and hold the action button. After doing this a timer will appear, starting at 30 seconds, counting down. Within this time the player must return to the original room (spawn room) and link it to the mainframe. Only by linking all three teleporters to the mainframe can the Pack-a-Punch Machine be used. Every time a teleporter is linked, the door opens a little more. It costs 1500 to teleport, and teleporting can only be accomplished by going from one node to the mainframe, never vice versa or to another node. Sometimes, the demonic announcer will say "uh-oh" or "no treat for you!" and no power-up will be dropped. It is then possible for a Hellhound to appear after the teleporter is used. After heavy use of the teleporters, groups of up to eight Hellhounds can appear at once after each teleport, either along with or replacing a power-up drop. This becomes more likely as the rounds progress, and can even happen while the teleporters are being linked. If the player goes outside of the map, a large black rectangular box can be seen. If reaching the inside, the same swirl that appears when the player teleports appears. It is here that the player is sent instead of directly to the mainframe. There are four of these rooms, one for each player. If someone went inside of these boxes, and someone were to teleport, the person teleporting would see the person inside the box. It is also quite possible the player is sent here in with collision off (so the player will not fall), as the weapon is put away.
Hellhound[]
Hellhounds walk about the map, limping or in a wolf hunting fashion until they spot players, at which point they ignite and attack. The Monkey Bomb does not work on Hellhounds. After round 15, Hellhounds will spawn with the zombies. After heavy use of the teleporters, Hellhounds appear and attack. At first, one Hellhound may appear instead of a power-up. Then, clusters of up to eight Hellhounds begin to appear, and will continue to appear after every subsequent teleport. It is possible for both a power-up and a quartet of hounds to spawn after a teleport. A dog's health will not increase after round 20 or so. They will always be killed by two Bowie Knife hits (one on the first 2 waves), or a single magazine of a non upgraded Thompson. Hellhounds can be killed in a maximum chain of 4. The Hellhounds of Der Riese are somewhat easier than the Hellhounds of Shi No Numa since they start out limping so that the players can get a good shot on them before they start charging.
Other Features[]
- The Monkey Bomb is a new weapon in Der Riese. It is a Cymbal-Banging Monkey Toy that has what appears to be dynamite attached to its back. It is used by pressing the secondary grenade button. When thrown, the distraction causes the zombies to crowd around it until it explodes.
- Perk-a-Cola machines and Electro-Shock Defenses return in this map.
- The Pack-a-Punch Machine, which can upgrade the players weapons, is featured in the map. When upgraded, the weapons have a new platinum-esque finish with what seem to be engravings on it and are upgraded to make them more effective
- The Bowie Knife is another new weapon. When bought, it takes the place of the normal knife. It is a one-hit-kill weapon, up to, approximately, Round 12, and costs 3000 points to purchase. Also, when the player bleeds out of revive time and respawns in a new round, the player will still have the bowie knife
- The map uses some environmental elements from Nightfire
- The FG42 is now a weapon that can now be bought off the wall for 1500 points
- On the pause screen, a map of the level will appear, unlike the previous maps.
- Zombies can now climb certain ledges and fences.
- The Mystery Box is once again pointed at by a trail of light from the sky. This time, the light is blue. Also due to the higher buildings and close box respawn areas the box may be hard to pin-point to unseasoned players. The iPod version (which does not include the "light trail" indicator) features a map at all mystery box locations that indicates the box's current location with a green light.
- Prior to the map's release, the map included a device known as the Ammo-Matic; a machine similar to the Pack-A-Punch that automatically supplies the player with max ammunition....but it was cut out at the last minute, however quotes relating to the Ammo-Matic still remain to this very day.
- There is a solar eclipse occurring in the map when playing in a full-screen game mode, but when playing Split-screen two player, it's around Midnight.
The Map[]
Rooms[]
Starting Room/Mainframe[]
Der Riese is set in a secret Nazi Factory in Germany. It has several rooms within it. The starting room is just outside the factory. There are four barricades against the Zombies. Two at either side of the mainframe, one to the side of the power generator, and one down a staircase. There are two doors that leave the starting room and lead to the right/left factory rooms.
In this room:
- Pack-a-Punch Machine - 5000 points per use, locked until power is turned on and all 3 teleporters are linked.
- Gewehr 43 - 600 points
- Kar98k - 200 points
- Mainframe - used to connect teleporters, all teleporters lead here
- Radio - Beside a barrel under a ledge near the entrance to the staircase barricade
- There are also a lot of illuminati signs under the bars of the sewers saying "Edward it's time to kill Maxis" (when you are standing on the mainframe with your back to the pack-a-punch machine, go down the stairs and on your left. Look down and you will see signs)
Right Factory Room[]
After opening the door on the right there is a door to the right hallway. There is a railing above in which Zombies can jump down from after the power is activated . There are also two barricades in which Zombies can break through. There is also a door that will open when the electricity is turned on, connecting this room to the Mystery Box spawning room. There is a locked door leading to the right hallway.
In this room:
- Double-Barreled Shotgun - 1200 points
Right Hallway (Hangar)[]
After opening the door in the right factory room, players come in here. In here there is a staircase leading to a box barricade. Two barricades are in here.
In this room:
- Thompson - 1200 points
- Mystery Box Spawns at the far wall adjacent to the furnace
- Monkey Bomb - In the furnace, only there after the Fly Trap is activated.
- Hidden note - Right near the bottom of the Thompson which can sink down when the "use" button is pressed
Left Factory Room[]
After opening the door on the left, there are two barricades and a door leading to the left hallway. There is also a door that will open when the electricity is turned on, connecting this room to the mystery box spawning room.
In this room:
- Fly Trap
- Teddy Bear - In a window up high, only there if the fly trap is activated.
- M1 Carbine - 600 Points
Left Hallway (Animal Testing Lab)[]
After opening the door in the left factory room, the player will come to this hallway. It contains the trench gun and three barricades. There is a staircase leading to a box barricade and another locked door leading to Teleporter A.
In this room:
- Trench Gun - 1500 points
- Mystery Box spawns across from Trench Gun
- Teddy Bear with Jugger-nog and C-3000 b1at-ch35, in a cage near to the right of the [[M1897 Trench Gun|Trench Gun]. This only occurs when the fly trap is activated
- Spinal cord - two of them are sitting across from each other on a desk and on top of some shelves
- Radio - Above door to the right of the mystery box spawn
Teleporter A Room (Generator room)[]
In the Left Hallway is a locked door, this door leads to this room. It contains the first of three teleporters. There is also two barricades and a radio in here. Also, across the teleporter, there are two blood splatters, one big, one small. If the player(s) look closely, they can see arms, 2 heads, and for the small blood splatter, a face.
In this room:
- Mystery Box Spawns in front of the teleporter
- Radio - On the lower level in the furnace near the right staircase
- MP40 right of the teleporter
Teleporter B Room (Chemical testing room)[]
After opening the locked door in the Right Balcony, the player(s) will enter a room containing yet another Teleporter. It contains 2 barricades which zombies can access.
In this room:
- Type 100 - 1000 points
- Mystery Box spawns in the doorway to the left if facing teleporter
- Spinal Cord - on a desk beside the barricade in the side room
- Radio - Activated by hitting the "Use" button when aiming at one of the ladders of the contained with a body floating in it
Mystery Box Spawning Room/Courtyard[]
After opening either box barricade in either hallway, the player appears on a balcony and a section just outside the factory. If the player jumps off the roof, they will come across the mystery box, sitting next to the power generator. There are doors leading to Teleporter Room C and Teleporter Room B. When the power is turned on, a bridge folds down connecting the two balconies and the room connects with the left and right factory rooms. There are many barricades in this area.
In this room:
- Left Balcony:
- Jugger-Nog - 2500 points
- Bouncing Betties - 1000 points
- Right Balcony:
- Double Tap Root Beer - 2000 points
- Radio - On a tipped filing cabinet left of the door to Z-B
- Main Courtyard:
- Power Switch is behind the Generator
- Mystery Box spawns in front of Generator
- Outer area (Outside Factory):
- FG42 - 1500 points
- Speed Cola - 3000 points
Teleporter C Room (Main factory area)[]
After opening the door in the Mystery Box spawn room, it leads to a building in the factory. Inside the building, the final Teleporter lies. There is also a set of stairs where a barricade is blocking Zombies approaching from a cave. There is a balcony outside and is used to fire down on Zombies approaching the building. The balcony is also a good spot to hold out at, as all zombies can come in from one direction and the height offers the players a good view on how many zombies are moving in.
In this room:
- Quick Revive - 1500 points
- STG-44 - 1200 points
- Bowie Knife - 3000 points
- Stielhandgranate - 250 points
- Mystery Box spawns at the end of the catwalk with above Bowie Knife
- Radio - two of them are in here, one on a shelf in front of the staircase and another one above the hole into the underground alleyway by the Quick Revive Machine, but is accessible from the back of the underground alleyway
Easter Eggs[]
- To find the musical easter egg the player needs to press the action button on the 3 green glowing jars that appear to have spines in them. 2 of the jars are in the animal testing lab, and the third one is near Teleporter B, in a side room. The song is Beauty of Annihilation. There is no specific order in which these need to be done. If done in iOS, you need to knife each of them in sucession, the same sound is heard as though hitting the use button on them in the console versions.
- Near teleporter B going onto the balcony, in the destroyed building across the street; legs of a hanging person can be seen (similar to hanging people on previous two maps). If shot, feathers seem to come out.
- There is a readable message inside an air conditioning unit on the lower side of the bridge that lowers with the power. It is viewable by looking through a break in the unit with a sniper scope. It reads: "In the event of any critical failure, the player is instructed to take his cyanide tablet that's included in his field operations kit. In the event that the player has misplaced his, there are several methods that will accomplish the same task. For example, the best..." (end of page.)
- Another book can be seen outside of the map. It appears to have the page prior to this page. It reads: "It is the responsibility of absolute secrecy. No one is to know what you do, where you work, our research has uncovered, or what our purpose will be. You will have no further contact with your governments, or with your families. Your decision to fully dedicate your lives to Group 935 is absolute. Attached is your field operations manual which will direct you should our mission get compromised. We cannot afford to let this power fall into the wrong hands, and therefore the field operations manual should be considered your bible. Make your preparations. A new dawn is beginning for mankind. Dr. L. Maxis"
- In addition to this message, there are several messages written on the walls that can be clearly seen.
- In the alleyway on the right (facing away from the Pack-a-Punch machine) there is a distinct shadow of an upright teddy bear on the wall.
- Throwing a Monkey Bomb into the furnace will make it scream. After it explodes, Samantha says "Why are you so cruel to Mr. Monkey? Mr. Monkey just wanted to PLAY!"
- Opening the door to the right from where the player spawns, by the Double-Barreled Shotgun, looking down, the player should see some wood panels. A few panels will be broken and inside there is a note. The message reads: "...is produced by bombarding an Americium-243 nucleus with a Calcium 48 nucleus. It then decays (writing is blurred)... after further decay a meta-stable isotope is formed. This leads us to believe that transference of matter is indeed possible, and even the re-animation of b... (faded, but it is presumed to be beings)" Element 115, Ununpentium, is made by combining Americium and Calcium together, then letting it decay.
- Written near the doors leading to the teleporters on the walls is a message reading "Return Through Aether". This may be referencing the light a player is bathed in when entering the teleporter.
- The room with the Quick Revive has a sign at the entrance that says "L. Maxis, MD Office" showing that that room was Dr. Maxis' office and he was the head scientist.
- On the roofs of some buildings, the words "help" and "SOS" are visible. They seem to be formed from sand bags and planks.
- If a player goes up to a perk machine and goes prone in front if it they will receive a free 25 points, possible from change underneath the machine, this can only be done once per player, per machine.
- In the underground tunnel near Teleporter Z-C, there is a gold plaque behind the staircase reading "Ludvig Maxis."
- In the Z-C teleporter room under the platform of the teleporter there is a broken piece of wood which reads ENG. Near teleporter Z-B there is a similar sign reading GER. Lastly there is another sign by teleporter Z-A reading FRA. It may be that these stand for England, Germany and France. This perhaps indicates where each teleporter was intended to transport the user to, if not to the mainframe this explains how the group arrived at Kino der Toten.
- In the Z-B teleporter room there is a torn note which translates "The bees disappeared from Ludvig's village." This is interesting, as the bees must be a reference to the zombies, as both travel in large groups.
- At the Juggernog machine, there is a sign that reads: "Unsupervised Children will be instantly sold to the circus!". This sign is also found in Verruckt.
- At the Trench Gun Mystery Box spawn, behind the mystery box is a board, with lots of torn notes and pictures. There is a picture of a Zombie in front of the Eiffel Tower in France. There is also a picture of a Hellhound. Another picture shows a horde of zombies.
- All the chalkboards have the words "Experiment 935 was a success" written in English. It also reads things such as "Edward I know it was you !" and "Never again Sam".
- In the Z-C teleporter room there is a board with "die glocke ist jetzt Malaile" (translation: the bell is now mobile.) pinned on the upper left, and "folgen Sie dem Gesamtplan" (translation:follow the entire plan) pinned on the bottom right.
- In the Trench Gun hallway, there is a door with a danger sign and a Hellhound's head on it. There is also a lot of blood on the floor here.
- One of Richtofen's quotes; "fluffy?, is that you?", is a reference to fluffy, Dr maxis's dog.
- The Zombies sometimes will say "Sam" when they attack.
Video(s):[]

Der RieseTrailer
")
")
")
")